Intro
This is going to be a two parter:
- Part 1 – This post, where I aggressively block failed connectivity attempts using fail2ban (with some crowdsec sprinkled in it).
- Part 2 – Where I install crowdsec on a reverse proxy running caddy. YOU ARE HERE.
The Web
In the first part, we hardened the docker-mailserver installation to aggressively block malicious users along with their immediate /24 vicinity.
In this part, I am going to briefly explain crowdsec and its concepts, and how I have integrated it with my Caddy reverse proxy and Cloudflare.
What is Crowdsec?
Crowdsec analyses potential threats to your infrastructure, usually via reading your logs. It runs its Security Engine locally and exposes the LAPI (local API). It then uses its security engine to generate alerts from potential threats. These alerts can turn into decisions which usually result into banning an IP.
Bouncers (effectively, crowdsec agents) are installed into ingress points of your infrastructure and act as a firewall utilising those decisions. But the real power of crowdsec is that all of the above is shared with the crowdsec community automatically (the CAPI), so any decisions made by the community are then applied to your setup as well. This protects your infrastructure from emerging threats that may have not attacked it yet.
My existing architecture
I have three ways to access my public and semi-public services. My previous setup and access scenarios are shown in the diagram below:
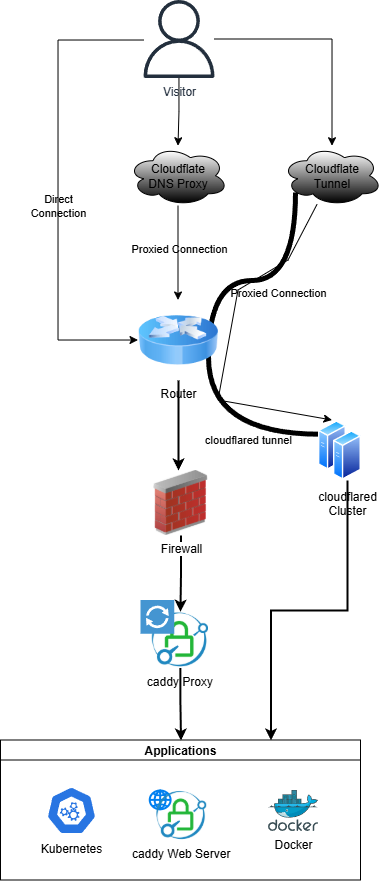
- Direct access to my services, without any proxying
- Cloudflare’s DNS proxying
- Cloudflare Tunnels
Not shown above are the VLANs each component belongs to. The router (and by extension its firewall) are handling trunk traffic; the cloudflared cluster, the two caddy server and docker are in a DMZ VLAN; and Kubernetes is on its own one (but could very well be in DMZ as well). There are quite a few things wrong with the above setup:
- Firewalling is pretty basic; it’s the OpenWRT firewall. There is no WAF present but I don’t want to install a heavy virtual appliance.
- Cloudflare blocks a lot of stuff, but it doesn’t block everything.
- Access via Cloudflare tunnels bypasses the firewall completely.
- Even access via DNS Proxying effectively bypasses the firewall completely, because the firewall doesn’t inspect the packets through the encrypted tunnel.
It was actually worse than that when it began. When I discovered Cloudflare Tunnels, I just pointed them directly to my Kubernetes ingresses and Docker containers. I was still experimenting and had a false sense of “secure enough” with Cloudflare protecting from the worst of the worst, plus, everything was isolated from my critical infrastructure. I tidied up a bit and ended up with the above architecture, but it’s obviously not where I want it.
How can we do better?
Crowdsec to the rescue!
I’ve been putting installing crowdsec off for quite a while now. Because of the indirect IP, with two out of the three scenarios things are more complicated than I would have liked and getting clear answers as to what exactly is needed can be tricky. But, since Cloudflare Tunnels constitute about 95% of my ingress to my applications, I needed to sit down and make it work; can’t rely exclusively on Cloudflare for protection. Which they do well, don’t get me wrong, that’s how people like me use their free services and advertise their offerings to enterprise customers that are willing to pay for more advanced features, but I don’t have any real visibility as to what is blocked and why.
So my first approach was to install crowdsec for the first scenario, i.e. for those visitors that access my infrastructure directly. That works since it’s pretty straightforward.
Then I went with CrowdSec Cloudflare Worker to protect from the other two. This creates essentially a Cloudflare Worker which inspects your traffic and blocks it before it even arrives to your network. While this works well enough, if you stay on their free plan you cannot use the community decisions, because you will hit the usage limits immediately; you really have to use their paid plan. You would also need to stream logs back to your LAPI if you want the worker to contribute to the decisions which complicates things more. To make matters worse, because of the way the worker interacts with your traffic, caching becomes impossible.
Regardless, I gave it a go. Within 2 weeks I started approaching the limits of the billed usage of the paid plan, so I had to decommission it and implement everything locally. Let’s see what we can do about this then.
Target architecture
Following is the architecture I want to achieve:
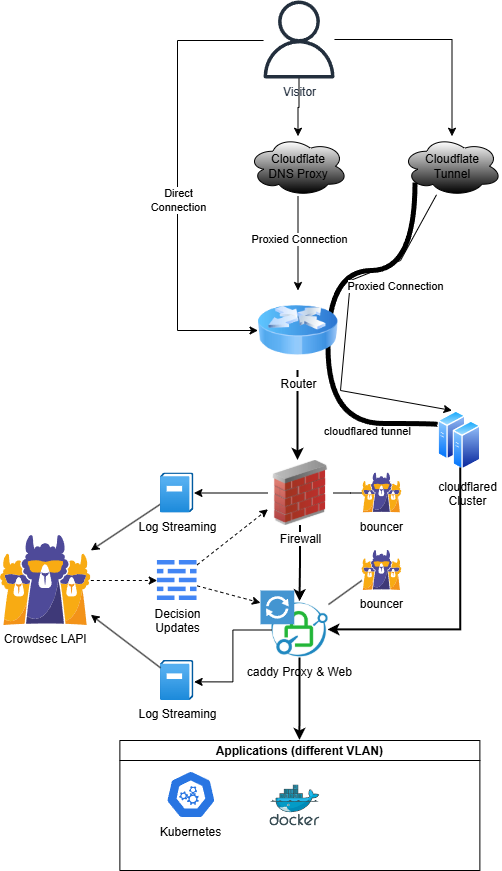
The immediate differences are as follows:
- I just got rid of the extra caddy web server. For the very (very) few instances I need to serve files or images or even a page directly, these can live in the Proxy VM.
- All Cloudflare Tunnel connections now point to the proxy, no exceptions.
- Crowdsec covers all three scenarios.
Let’s begin by installing crowdsec.
Installing crowdsec
Security Engine
First, we need to install the Security Engine. I have a virtual machine dedicated for this purpose which lives in my internal VLAN. I followed the official instructions from here and there were no complications.
OpenWRT bouncer
In OpenWRT you need to install the crowdsec-firewall-bouncer package. You can also install its UI component if you want.
Go to your crowdsec machine and run cscli bouncers add <NAME>. This command will create a registration for a crowdsec bouncer and return an API key which you will use in the next step.
Back to OpenWRT, edit the config file (found in /etc/config/crowdsec):
config bouncer
        option enabled '1'
        option ipv4 '1'
        option ipv6 '0'
        option api_url 'http://CROWDSECVM:8080'
        option update_frequency '10s'
        option deny_action 'drop'
        option deny_log '1'
        option log_prefix 'crowdsec: '
        option log_level 'info'
        option filter_input '1'
        option filter_forward '1'
        option api_key 'YOURAPIKEY'
        list interface 'br-wan'
Wait a bit and then on your crowdsec machine type cscli bouncters list. If everything is normal you should be seeing something similar:

You should be seeing a recent Last API pull entry. On your OpenWRT device type nft list sets. If you see many many IPs, tens of thousands even, then that means that your bouncer has synchronised correctly with the LAPI.
If it doesn’t, restart the service on OpenWRT and attempt cscli capi register on your crowdsec machine. Wait for a bit and you should see it update.
Caddy bouncer
Custom caddy build
This was the step I wanted to avoid, but let’s get down to it. First, you will need to build caddy with certain custom modules, because the functionality needed is not provided by the official release.
I found that the easiest way to do that is to use docker. Here’s a script that will do what we need:
docker run --rm -e GOOS=linux -e GOARCH=amd64 -v "$(pwd):/output" caddy:builder \
    sh -c "xcaddy build \
        --with github.com/caddyserver/transform-encoder \
        --with github.com/caddy-dns/cloudflare \
        --with github.com/hslatman/caddy-crowdsec-bouncer/http@main \
        --with github.com/hslatman/caddy-crowdsec-bouncer/appsec@main \
#       --with github.com/hslatman/caddy-crowdsec-bouncer/layer4@main \
        --with github.com/WeidiDeng/caddy-cloudflare-ip \
&& cp caddy /output/caddy"
That layer4 module is something you can probably skip. I did in my case, since the OpenWRT bouncer takes care of that. This will create an executable. Copy that to e.g. /usr/bin, then create a service, e.g. caddy.service under /etc/systemd/system/ as such:
[Unit]
Description=Caddy
After=network.target network-online.target
Requires=network-online.target

[Service]
Type=notify
User=caddy
Group=caddy
ExecStart=/usr/bin/caddy run --environ --config /etc/caddy/Caddyfile
ExecReload=/usr/bin/caddy reload --config /etc/caddy/Caddyfile --force
TimeoutStopSec=5s
LimitNOFILE=1048576
PrivateTmp=true
ProtectSystem=full
AmbientCapabilities=CAP_NET_ADMIN CAP_NET_BIND_SERVICE
Restart=on-failure
RestartSec=5

[Install]
WantedBy=multi-user.target
Run systemctl daemon-reload, followed by systemctl enable caddy and systemctl start caddy. If done correctly, systemctl status caddy should show it as running.
You have built and installed caddy, but now we need to go back to the crowdsec machine for a bit.
Adding another bouncer (plus some additional configuration)
Back on crowdsec, create a new bouncer, e.g. cscli bouncers add reverse-proxy. You can of course name it whatever you want. Keep the API key somewhere for later.
Under the /etc/crowdsec/acquis.d directory create a file named appsec.yaml with the following content:
appsec_config: crowdsecurity/appsec-default
labels:
  type: appsec
listen_addr: 0.0.0.0:7422
source: appsec
This will create a WAF that listens to port 7422, in addition to the security engine that listens on port 8080. Create an additional file named caddy.yaml with the following content:
filenames:
  - /var/log/reverse-proxy.log
labels:
  type: caddy
Don’t worry about this log file, we’ll handle that later. Before you go to the next section, you need to add a collection in crowdsec that will enable it to understand and parse caddy logs. Type the following command: cscli collections install crowdsecurity/caddy and then restart or reload the crowdsec service.
You must also install two collections for the WAF as such: cscli collections install crowdsecurity/appsec-virtual-patching crowdsecurity/appsec-generic-rules which I got from here. You can find many many more collections here to strengthen your firewall here; I’m still looking at the catalog, but these two will provide some basic rules that cover most web servers as well as “virtual patching” of known vulnerabilities. Great!
Basic caddy configuration
The configuration for caddy lives in /etc/caddy/Caddyfile. Here is a minimal one:
(log) {
  log {
    output net udp/YOURCSMACHINE:514 {
      soft_start
    }

    format json
  }
}

{
  http_port 80
  https_port 443

  crowdsec {
    ticker_interval 15s
    api_url http://YOURCSMACHINE:8080
    api_key "YOURAPIKEY"
    appsec_url http://YOURCSMACHINE:7422
  }

  servers {
    trusted_proxies static <YOUR CF TUNNELS AND OTHER INGRESSES> {
      source cloudflare {
        interval 12h
        timeout 15s
      }
    }

    client_ip_headers Cf-Connecting-Ip X-Forwarded-For
  }
}

# Example website
example.org {
  import log

  route {
    crowdsec
    appsec

    root * /var/www/example.org
    file_server
  }
}
Now, this does the following:
- Creates a “snippet” for log streaming. Snippets in Caddy are reusable pieces of code. This particular one, will send the logs to a service that’s listening in the crowdsec machine, which we haven’t installed yet.
- It configures the crowdsec bouncer and also enables the WAF (the appsec_url entry).
- It instructs caddy to trust the machines that the connections come from, in my case the two VMs running the cloudflared agent and also the IP ranges that Cloudflare uses (provided by the cloudflare_ip plugin), so as to avoid unwanted blocking.
- It also defines which headers may be used to determine the actual IP of the client, rather than that of an intermediate proxy.
- It defines an example site, which uses the log snippet we defined and enables a basic web server.
Save your changes and restart Caddy.
Note: You can add additional logging if you want; you are not forced to use only one facility.
Log Streaming
We need to be able to stream the logs that Caddy generates back to the Crowdsec security engine so that they can be analysed. To do that, we need to install rsyslog which is a log server. On your crowdsec machine, install it and then edit the /etc/rsyslog.conf file.
The critical sections you need to configure are the following:
module(load="imudp")
input(type="imudp" port="514")
template(name="FromCaddy" type="string" string="%msg:sub-string:{\"%\n")

if $fromhost-ip == 'REVERSEPROXYIP' and $msg contains_i 'Caddy' then {
  action(type="omfile"
    file="/var/log/reverse-proxy.log"
    template="FromCaddy")
  stop
}
This configures rsyslog to listen to UDP port 514 and when it receives a message which contains the text caddy (case invariant) from your reverse proxy IP, it will store the message to /var/log/reverse-proxy.log.
Now, to make sure that the disk won’t fill up with logs, go to the /etc/logrotate.d folder and create a file named caddy with the following contents:
/var/log/containers-public.log {
    maxsize 50M
    daily
    rotate 7
    compress
    missingok
    notifempty
    create 640 root adm
    sharedscripts
    copytruncate
    postrotate
        /usr/bin/systemctl kill -s HUP rsyslog.service >/dev/null 2>&1 || true
    endscript
}
This will ensure that logs are rotated and not grow beyond 7 days. I had to get the solution to the rotation of the log by an LLM because rsyslog went haywire when logrotate rotated the logs. It’s been working like this for weeks now, so you can trust it to work for you as well. If it doesn’t, ensure that your rsyslog is at least version 8.
By including that snippet in all of your site definitions, you ensure that Crowdsec’s security engine has a chance to parse the logs and create decisions. Does it work? Only one way to find out!
Verify that Crowdsec parses the logs
After crowdsec and caddy have been running for a while, type cscli metrics show acquisition and cscli metrics show appsec. You should be seeing something similar to this:

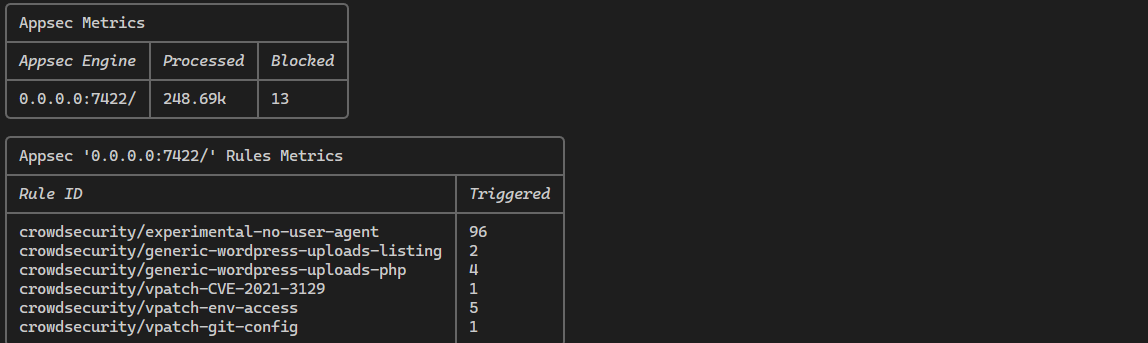
The first screenshot should show you the two acquisitions we added, one for the reverse proxy (caddy’s logs) and one for the appsec. You will want to see most lines parsed; you can also ignore the unparsed ones as long as they are a minimal percentage of the total lines parsed (in my case it’s 0.5%), because they belong to internal caddy management.
You will also see how many requests your WAF has processed and what rules may have been triggered if any.
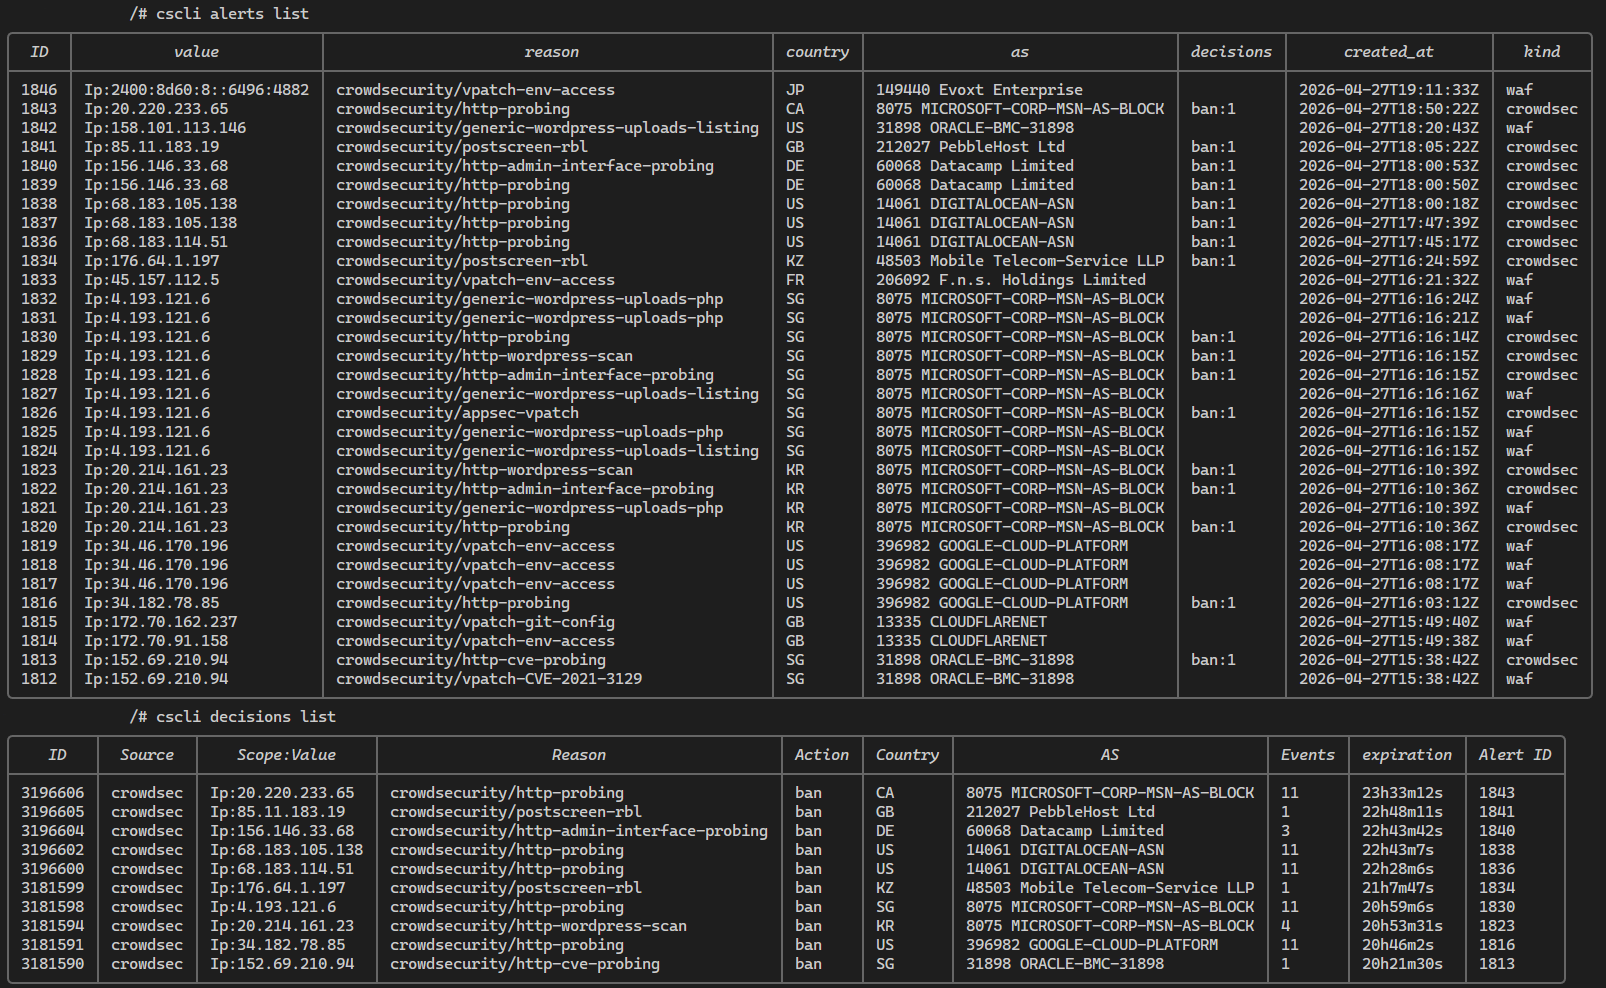
And at this point, I think we are done. Wait for a bit and you should be able to see your alerts and decisions rising (by typing cscli alerts show and cscli decisions show). Here’s mine after running for a few hours:
Overview
In the above we have achieved the following
- Install crowdsec
- Install the WAF & Caddy parsing collections
- Install a bouncer in OpenWRT
- Build & install caddy
- Install a bouncer in caddy
- Stream caddy logs to crowdsec
- Configure crowdsec to parse caddy’s logs and act as a WAF
Haven’t you forgotten about something?
Yes. OpenWRT. Actually no, I haven’t forgotten about it, even though I’ve included in the diagram. The reason is that my router barely interacts with any of the packets that go through it, since I don’t have public services running on it directly and it would offer little value.
You should reconsider that however, if you have a VPN service for example running directly on your router.
Bonus! Crowdsec Web UI
You can use Crowdsec Console to monitor your instance, but that’s a cloud offering and I prefer to run everything locally, even though Crowdsec already has details about your installation. A very nice person has developed crowdsec-web-ui which you can deploy locally.
The repository offers a docker compose example, you can adapt it to a Kubernetes manifest using kompose. In order to allow crowdsec-web-ui to communicate with the LAPI, you will need to create a machine by typing the following:
cscli machines add crowdsec-web-ui -f- --auto > /dev/nullYou should get an output similar to the following:
Machine 'crowdsec-web-ui' successfully added to the local API.
url: http://0.0.0.0:8080
login: crowdsec-web-ui
password: GENERATEDPASSWORD
Use these credentials in crowdsec-web-ui.
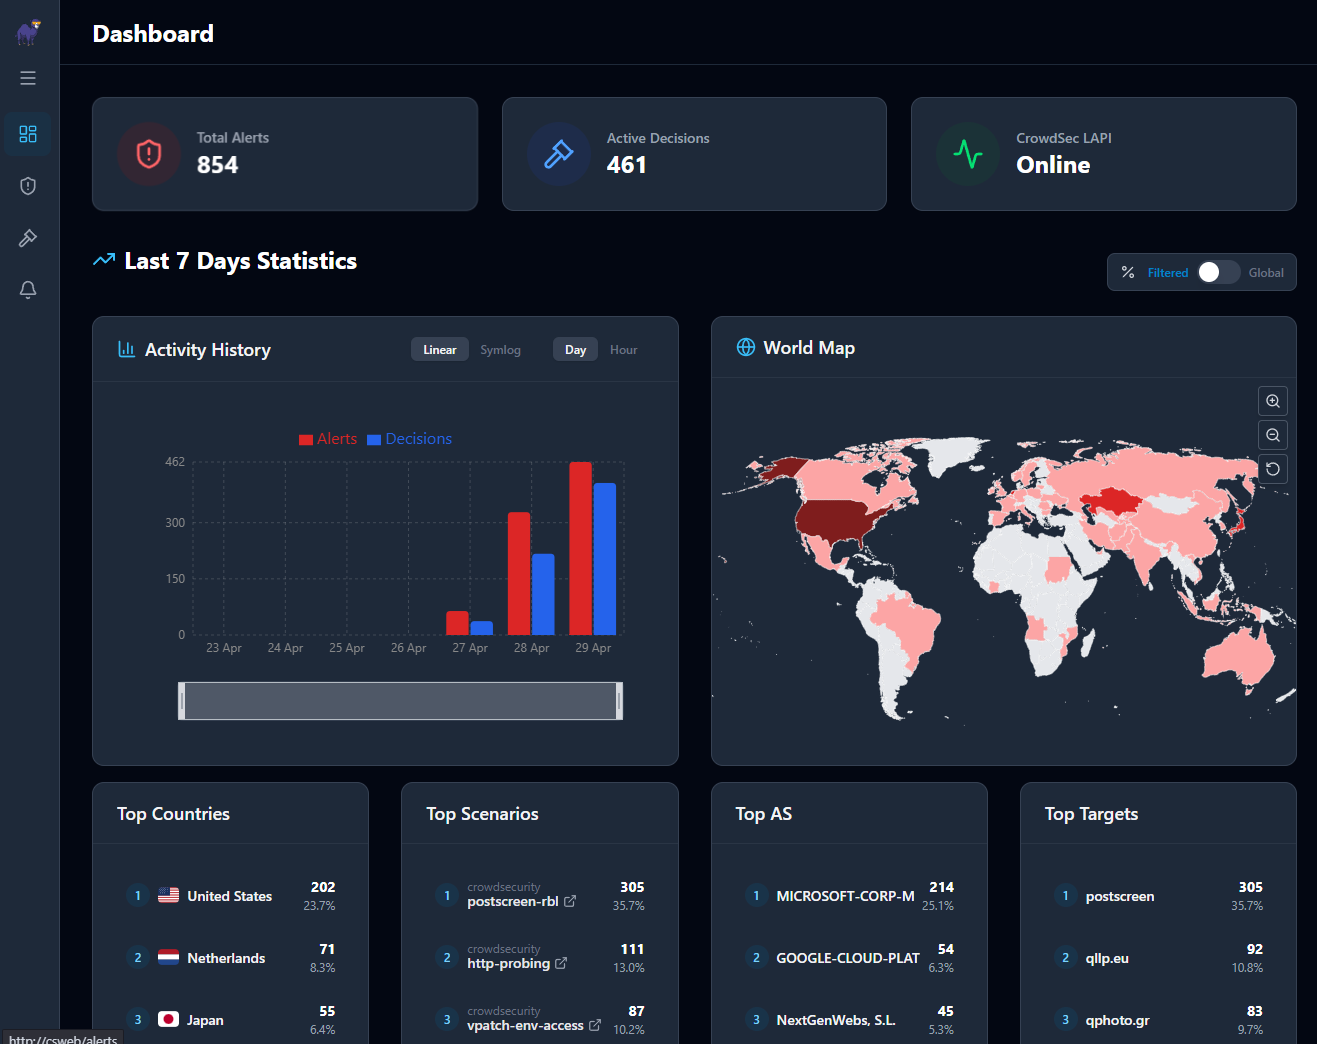
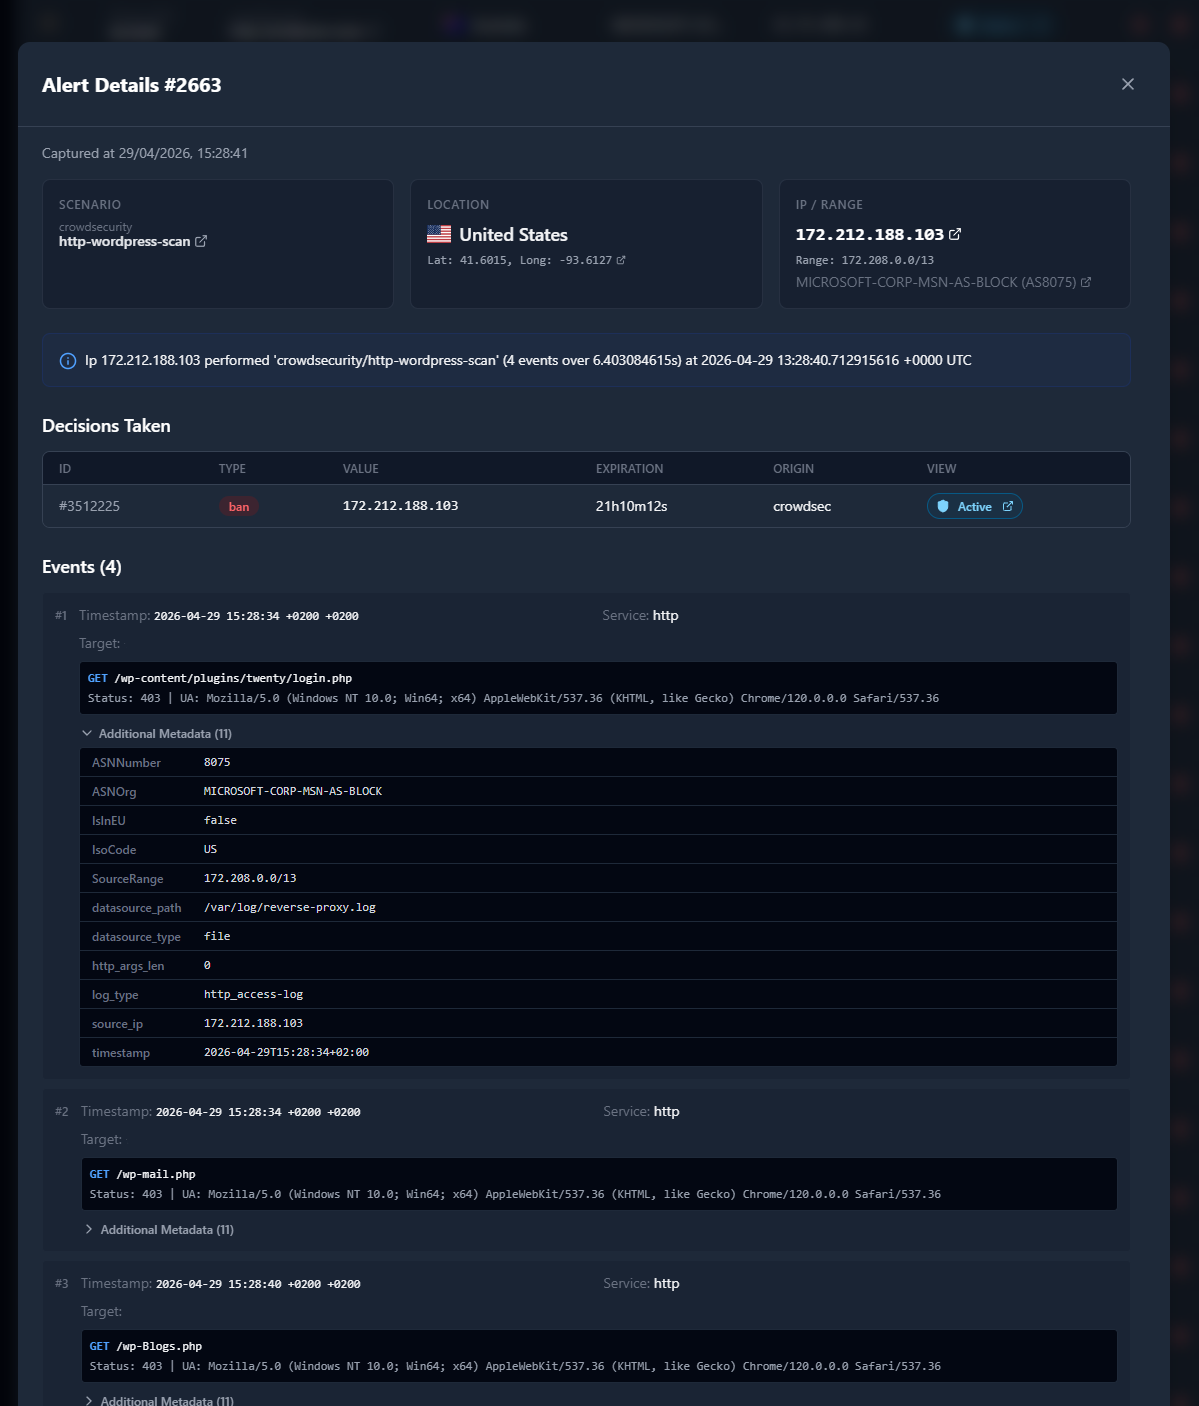
You get a nice overview of the active alerts and decisions. You can also drill down to the alerts and see detailed information regarding the origin of the attack, the attack method, the number of attempts and so on.
Double Bonus! Prometheus
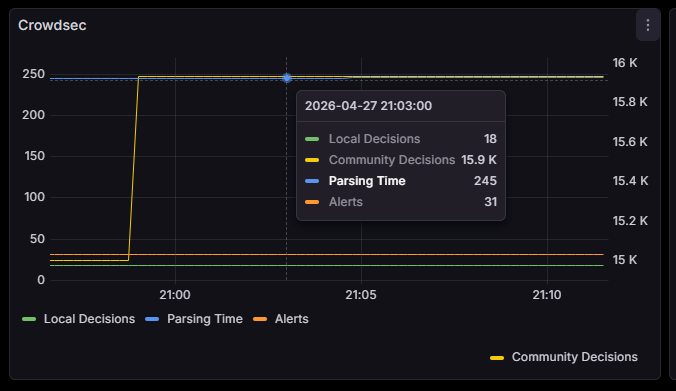
If you have a Prometheus/Grafana installation, crowdsec exposes Prometheus logs at port 6060. Here’s an example of a Grafana dashboard running:
Feel free to send me any questions at blog[at]vtable[dot]org. I had to disable comments here, since the amount of spam was unmanageable.