
In my previous post, I detailed how I got my 2 routers and 2 PiHoles to be highly available, thanks to keepalived. I still have this solution deployed and it works very well.
However, about 2 weeks ago I decided to extend the concept of high availability to some of the services I host locally (including this website). These currently run on a separate VLAN (properly named dmz), in a Proxmox Virtual Machine, which in turn runs Docker. The applications run as docker stacks, where each one is self contained: database, front-end and backend (if any). There is definitely nested virtualisation which is not ideal, but I would rather not run workloads on the hypervisor directly.
Making these services highly available would require deploying a second VM (ideally a third too), then using keepalived along with HAProxy to provide load balancing. Then, certain services would have to be moved off of the containers. For example, each DB server per application I used to have as a container, would now have to be converted into a centralised cluster, such as MariaDB Galera, in order for the DB to also be highly available.
Objectives
We do need to define what the objective of HA is then.
Having a highly available service means that you try to eliminate as many single points of failure (SPoF) as possible. Some of those SPoFs require compromise for a home setup, e.g. electricity, physical security, natural disasters etc, things that are not easy to control or even predict for, the however rest can be dealt with relatively easily.
In short, the question becomes then, Can I still serve my website even if my server and Internet connection go down? The Internet connection can be dealt with by having a second one (check my previous post) even behind a CGNAT and even with a few compromises (e.g. NAT), but the services and their hosts requires more work.
Networking HA will be done with my main fibre and the backup 4G connection and the help of Cloudflare, to get around CGNAT. For Compute, I decided to use a solution that is at the same time better and worse than what I had so far, Kubernetes.
Some context and clarifications
I am not a Kubernetes expert. Far from it, I have used it in some managed capacity in the cloud, where most of the infrastructure concerns are generally far removed from the developer. The biggest issue with Kubernetes in an On-Premises context, is that because of its flexibility and plugin-oriented architecture, it’s easy to break things. The initial configuration can be hard to get right and at some point you may… well, break things and risk taking the whole cluster down, if repairing the mess is harder than starting from scratch.
Take whatever I say here with a grain of salt. Also please note that this is not a guide, although I do plan to publish something later, when I’ll be more certain that I am not giving out bad advice. tl;dr, I (probably) have no idea what I’m talking about; take everything here with a grain of salt.
The Installation
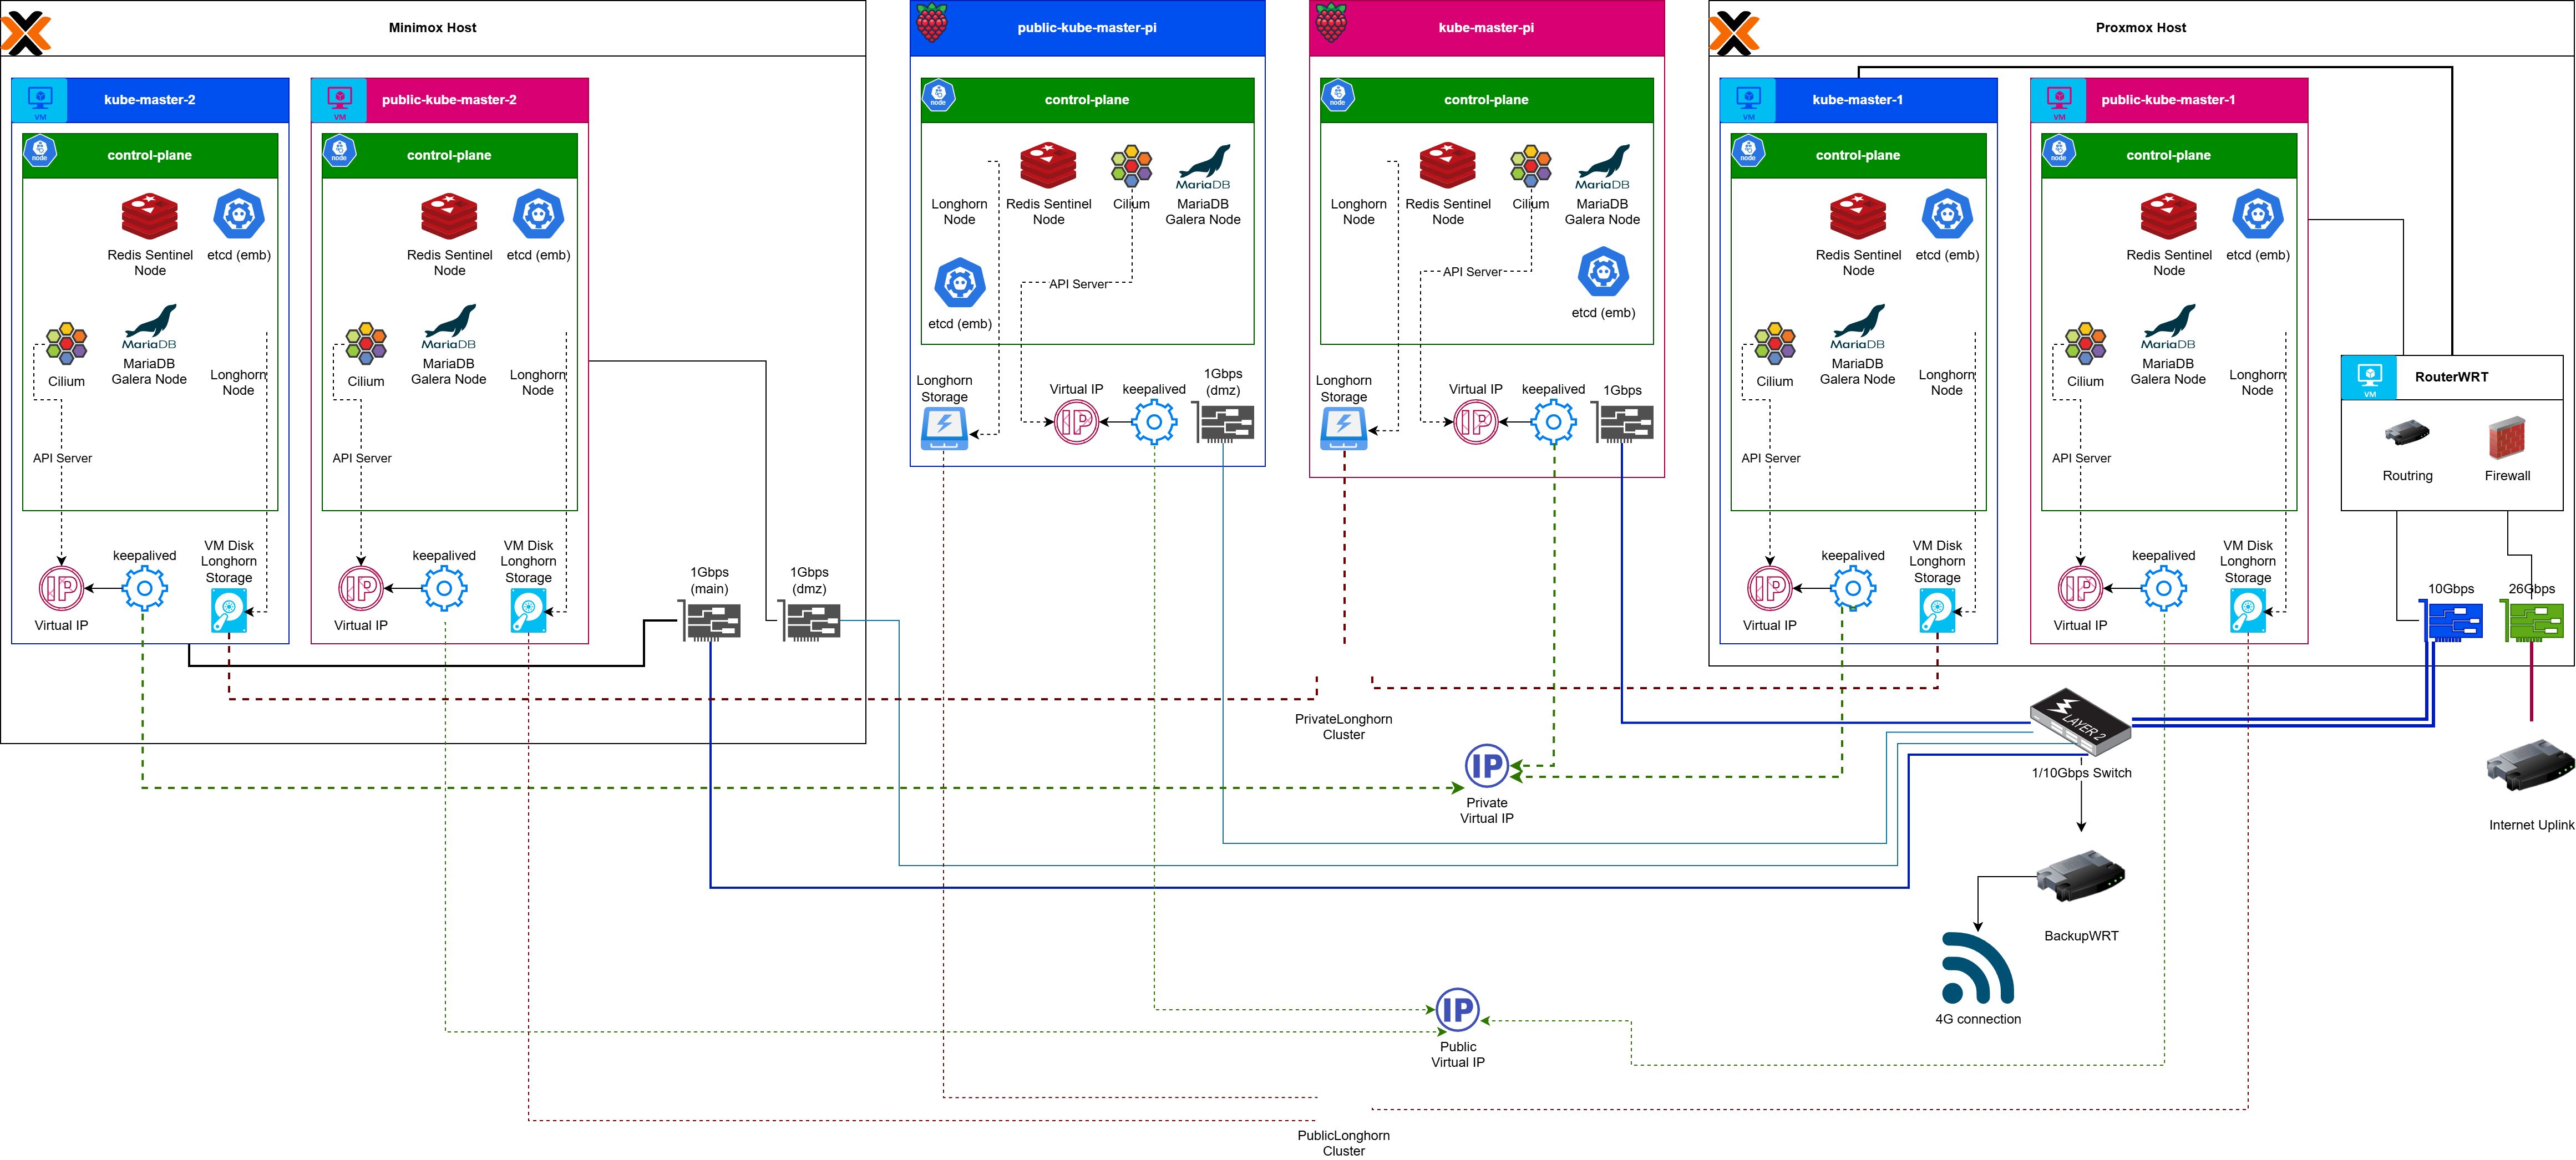
Hardware Setup
Initially I had 3 nodes. One VM and 2 Raspberry PIs. However, after I bought a Mini-PC, I decided on a different setup.
That setup is to build 2 clusters. One of them will serve my internal services, that have no reason to be accessible from anywhere but from within my local network (and my VPN), the other one is for public services that are served over the Internet and in some cases without authentication. And since this represents a security hole, it makes sense to me to add an extra layer of security and having this cluster restricted to the dmz VLAN.
So, my main server runs Proxmox and has quite a few resources to spare, but the Mini-PC has merely an Intel N150 and 32GB of RAM. I installed Proxmox to that machine and created two VMs. As such, each cluster is represented by a VM in my main Proxmox server, a VM in the Mini-PC Proxmox server and a Raspberry Pi 5. Note, I haven’t joined the two Proxmox installations together, because I don’t need the benefits of a Proxmox cluster.
One consideration to keep in mind about these mini-PCs is that they at best will come with 2 M.2 slots but only one of them will be NVMe and the other is M.2 SATA. Creating a ZFS mirror can be clunky and expensive with this setup, so I instead used a spare 256GB M.2 SATA I had lying around for the VMs and a WD Red Pro for storage. These are backed-up daily, so if I lose either of the drives, at worst it will be a minor inconvenience, however I don’t expect to lose any uptime. My main server runs the VMs on enterprise SAS SSDs which are far more resilient. Still, add alerts for SMART!
The Pis have an NVMe hat on them, not only to reduce disk latency but also to avoid killing the SD cards early. These NVMe drives as well as the VM’s (SAS SSD-backed disk) will be used for file storage too. The workloads are not going to be too heavy, so the 1Gbps uplink the Pis provide should be enough. You can definitely go with a hat that has 2 NVMe drives, but I’m relying on my backups and the cluster itself to allow me to recover from a potential catastrophic failure quickly and (relatively) painlessly.
Kubernetes
All information from here on will apply to both clusters, unless explicitly noted.
I tried to go full native and install Kubernetes using kube-adm. I failed rather miserably, because some steps were unclear and some others made a lot of assumptions, and… after a few retries from scratch, I decided to look for alternative Kubernetes distributions. There are quite a few, but I ended up with k3s.
It’s important to clarify here that k3s is k8s, unlike some other lighter Kubernetes versions. Anything you can do with k8s, you can do with k3s, the difference being that k3s is designed to be very easily provisioned as well as uninstalled. It provides certain good-enough defaults out of the box, which you can of course customise however you like.
The point is, I had fun (almost) setting up k3s compared to my miserable k8s experience. I tore down the cluster a few times as I was learning and screwing up things, but the point is that I could easily remove everything with an one-liner and get back to it from the beginning, keeping my manifests & Helm values files as a sort of checkpoints during the journey.
Installing
k3s installation
Installing k3s and adding control plane nodes to it was a breeze. The control plane nodes are by default schedulable, but of course, this can be changed later. I followed this guide and went with an embedded but replicated etcd and as you can see it really is an one-liner.
Networking plugin (CNI)
By default, k3s comes with flannel and that works well enough. After a friend’s recommendation and reading about CNIs, I decided to install cilium instead, to take advantage of the network policies and monitoring capabilities, and in order to do that properly, I used this excellent guide that helped me experiment and understand each of the involved steps. There are some caveats though, that I will explain later.
Distributed File System
If I am to have a highly available cluster, I also need a highly available filesystem. I cannot rely on storing files on a single node, because if that goes down, the service is cooked.
I tried a few of them. Initially I went with GlusterFS and I was surprised with how easy it was to setup and utilise. Unfortunately, GlusterFS seems to be going out of vogue and it does not provide block storage, rather filesystem only. The way I understand it, is that replication between the nodes happens on a file level, which means that certain applications such as databases are going to be terribly inefficient. Next.
I had a look at Rook/Ceph after that. Ceph is an incredibly powerful, reliable, and scalable DFS, but if it breaks, you are going to have a hard time. It really is designed to run on its own nodes though (separating compute from storage is always a good practice) and is rather demanding on the resources, so combined with some initial setup issues (I was still a novice at that time), I dropped it.
Minio seemed a likely candidate, but it has a recommendation of 4 nodes and some of the syncing was a bit hard to grasp properly as well. Update: I realised that you apparently need 4 drives to support erasure coding which was what I was hung up on. You don’t really need erasure coding (aka parity) for a homelab.
In the end, I ended up with Longhorn. Longhorn was developed by Rancher and is now part of the CNCF. There are some horror stories with it, though they usually refer to quite older versions, but I’ve found it to be stable and survive abrupt node shutdowns. It also has a UI which you can optionally use to configure it, but it provides nice “quick-glance” visibility.
If I were to do this again now that I have gained more experience, I would probably give Rook/Ceph one more go, but I haven’t been unhappy with Longhorn so far.
Monitoring
That’s the most important part of a cluster setup, to have a good idea of what’s going on with it and be able to receive alerts. I’ve deployed a distributed Grafana & Prometheus solution which works (and acts as the metrics hub for my other non-Kubernetes machines).
I do not have two Grafana installations, instead there is only one in my private cluster, which pulls data from the public cluster’s Prometheus installation.
I have yet to install log aggregation (probably Loki would be the way to go, to mirror my previous configuration).
Database(s)
MariaDB cluster
Most of my services use MySQL/MariaDB for data storage. As I mentioned, I used to deploy docker stacks with the application container along a database container. I liked this approach because of the segmentation between applications, but this wouldn’t work here.
There is a project called Galera, which is a MariaDB/MySQL cluster solution that provides an Active-Active implementation. Setting this up with a Helm chart was easy, although as it is always the case with Helm charts, you really need to go through usually thousands of lines of the values file, to ensure everything is what you need it to be, even though you usually can ignore most of the file contents.
Since this is a cluster that creates StatefulSets, I had initially configured the amount of replicas in Longhorn to be 1. The default 3 would create essentially 9 copies of the database, which could saturate the network and would be a waste of space. Instead, the cluster will attempt to heal itself if one of the three nodes goes down and with regular backups the configuration is safe. Also, that blew up on my face, but for more on that later.
Note: I have two installations of MariaDB. Isolation is the name of the game after all.
Redis cluster… or not!
I use Redis for some of my services. Redis provides two HA options, Redis Cluster and Redis Sentinel. The biggest difference between them is that Cluster performs sharding of the data across the nodes, whereas Sentinel focuses on replicating the data across all nodes and replacing a failed node with one of the backup ones. In other words, the focus of Sentinel is robustness, whereas Cluster focuses on scalability. For my usage, Sentinel was the way to go, but… it’s not as transparent as the MariaDB cluster is. Sentinel requires the client to be Sentinel-aware, in order to redirect traffic to the correct node, otherwise you can only have read access from a direct node (which would be pointless).
Redis Cluster is better in that regard, but also requires the client to be able to handle a similar scenario, in order to retrieve keys from different nodes. For that one particular application that used Redis for session management but supported neither of those scenarios, it pretty much forced me to go with a single Redis instance, which in case of a node downtime I’d expect it to take some time to be scheduled to a new node.
Secrets Management
You probably already know of Hashicorp, the creators of Terraform (to which Azure Bicep seems eerily similar). They also have other software solutions, one of which is Vault, which is designed to manage secrets at scale. Vault is becoming an industry standard and it seemed like the logical option for secrets management, since by default Secrets in Kubernetes are not encrypted. Which for a homelab should be fine if we are honest, but no, I had to subject myself to torture.
There are a few considerations when using Vault though, which I will list later, although in the end I decided to drop it.
TLS Certifications
This was surprisingly easy. You install cert-manager, you configure a number of (Cluster) Issuers and then it uses annotations to wrap calls to ingresses automatically. So far I’ve only used a CA issuer, in order to sign my internal websites with my own CA I use. I haven’t had the need to use Cloudflare’s or Let’s Encrypt’s due to exposing websites via Cloudflare Tunnels (more on that later), but the setup is similar.
Deploying one Application and making it Highly Available
I maintain a forum which I use amongst friends, based on PhpBB. Forum engines are quickly becoming a thing of the past and most solutions are really not designed to play nicely dockerised or in Kubernetes. Bitnami has had a lot of applications as docker images and Helm charts, although their PhpBB package has been marked as deprecated and I will have to replace it with something else, perhaps Discourse (despite its awful search mechanism).
Goes without saying that this is deployed to the public cluster.
Database migration
This was the easiest part. With a LoadBalancer pointing to my MariaDB cluster, I fired up HeidiSQL to the old container, took a backup (ensuring to override autoincrement numbers) and then restored it to the cluster, configuring the user as well.
Filesystem migration
Migrating the volumes from docker to Kubernetes was a bit more complicated than I would have liked. I used kompose to give me an initial manifest from the docker compose file, and while it’s not really usable out of the box, it provides a good foundation on how to customise it. I removed the autogenerated database pods from the manifest, but I wasn’t ready to deploy just yet.
The way Bitnami images work, is that they will read certain environment variables and then create configuration files on persistent volumes (e.g. database credentials). I haven’t tested whether a change in the environment variables will effect a change in the configuration file, but the idea was to copy the files from the persistent volume (configuration, themes, uploaded files etc) to the Longhorn backed volumes.
Longhorn does not provide a way to browse files in its volume. The better way is to create an initContainer with something like busybox, mount the target volume to it, and then use kubectl cp to move the files. An alternative is to mount the volume on the host (as RWO only, RWM didn’t work for me) and then mount it in the filesystem (using the mount command)
Scaling the Compute
Now, in order to be able to have two instances of this website, I had to have two pods, running on different nodes. To achieve that, I had to do the following:
- The PersistentVolumeClaim had to be to a ReadWriteMany volume, because PhpBB uses the filesystem for caching and file uploads. I am not sure if there is a way to use a different storage for caching and file storage, but at some point I would have to be able to read and write to the same files from multiple pods. While RWM volumes offer generally lower performance (especially on Longhorn), my services are not too demanding anyway.
- Disable X-Forwarded-For in PhpBB. I haven’t managed to make X-Forwarded-For work with cilium and PhpBB, causing sessions to be dropped.
- I suspect that this is due to the traffic being forwarded within the nodes, but I may have to revisit that.
After applying the manifest I could see that two pods on two nodes were running. The website seemed to work as it should and it survived a node shutdown (more on that later). There is still one SPoF though, the incoming connection.
Connection High Availability with Cloudflare
Cloudflare has an offering called Cloudflare Tunnel which works in a similar manner to Tailscale (with which I’ve replaced my clunky and ugly OpenVPN installation). In short, you install a service on your machine, then the service makes an outgoing connection to Cloudflare’s servers and maintains an active tunnel. It’s a form of VPN and you can use certain more advanced configurations in order to expose whole networks or even segments of them.
In my case, I needed something simpler though. Since Tunnel works well with the Cloudflare DNS proxying, I could have a publicly available hostname redirect to the tunnel, which in turn redirects to a specific backend in your home network. The best part is that it does that while providing Cloudflare’s front-end TLS certificate, without requiring to even configure an Origin Server certificate (as per Cloudflare).
As you can tell, this is the best way (or one of the best anyway) to break past the CGNAT restriction. But this in itself is not highly available, since if the host where the cloudflared service runs goes down, there goes your tunnel and your website! Luckily, you can have multiple instances of cloudflared deployed, all belonging to the same tunnel, and this provides a good enough form of High Availability. Best part? It’s free.
Note that this does not provide any ability to load balance, steer traffic or anything of that sort. There is another service that Cloudflare provides, called Load Balancer which is designed to do exactly that and also works with Clouflare’s DNS proxying. My initial plan was to use the Load Balancer to route traffic either through my standard Internet connection (proxied as normal), or through the Tunnel if that one wasn’t working. Unfortunately, Load Balancers are not free. While the cost for my basic usage is not huge (merely USD 5 per month), it is tied to a domain name and I have quite a few.
To make an already very long story short, this works. I’ve shut down my main server where one of the nodes was running as a VM and the website was reachable with almost imperceptible delay. Then I rebooted it and shut down the Pi where the second instance of the website was running and thanks to the two tunnels and two pods running, I had achieved high availability!
Security
As I mentioned before, I used VLANs to restrict access to the rest of my network. I… haven’t found a way to do this reliably within Kubernetes and to assign some services to VLAN X and others to VLAN Y which was the main driver of going with two separate clusters. I know that the enterprise version of cilium supports this, but this would be out of scope for me.
The next step is to consider pod & container security, as well as network security, which was something I’d configure anyway, VLANs or not. Pod & Container security can and should be enforced using the following mechanisms:
- Configure the container and the pod to run as non-root and configure its security context. Most modern releases are designed to run as non-root already.
- Optionally, enforce the read-only file system, which is incompatible with some containers (e.g. Bitnami/PhpBB).
- Use Pod Security Standards to enforce a baseline of security with the option to deny an action or at least warn about it.
Networking security can be applied using NetworkPolicy or CiliumNetworkPolicy resources (in my case). Using network policies you can (and should) restrict inter-pod & service communication, as well as restrict the rest of the non-Kubernetes network. In my case, I heavily restrict the egress of the dmz VLAN (through OpenWRT’s firewall), but I allow it to reach certain services in my network (such as DNS). Even with the dmz VLAN, it’s a good idea to restrict pods to only the addresses it makes sense for them to access and restrict everything else.
No matter what you do, you should expect the worst, be it coming from a container vulnerability or a Kubernetes 0-day, and you should enforce a minimum security baseline on the container, pod, and network level. Additionally, by virtue of cilium & hubble, you can have observability on your network, which is a very powerful tool.
Known Issues & Gotchas
During this journey, I have encountered quite a few limitations and gotchas and I am going to list them, in grim detail.
Cilium
The first issue I encountered with cilium had to do with how LoadBalancers and Ingresses work and failing to configure them properly. Cilium’s ingress does not need a controller, since it uses the eBPF infrastructure provided by cilium already. A cilium ingress will create an underlying Load Balancer (or use a NodePort) and you have to allocate a pool of addresses to use it. The backing service can be a ClusterIP of course, but the exposed IP will have to be one of those.
Cilium’s Load Balancers work using one of two ways. Either through BGP (which I am not brave enough yet to tackle) or Gratuitous ARPs. It creates a virtual IP using the host’s MAC addresses, and then advertises it through the network. This IP is then accessible from the network and load balancing using an Ingress within the cluster works as it should.
You could also use the Load Balancer from cilium directly, but in this case there’s no internal load balancing. Only if a node dies, by virtue of Gratuitous ARP, the next node will get the IP, similar to keepalived in a sense. Figuring that out, took me a bit of time, but in the end it was a relatively minor thing.
The second problem was far more insidious. At one point, I shut down one of the nodes to test the resilience of the system. I expected everything to keep working but… no. That one website and services stopped responding or would time out and cilium pods would crash.
After searching for a cause, I saw that the cilium pods failed to communicate with the API server. The reason? As part of that (otherwise excellent) guide to setup k3s with cilium, you define a configuration variable called k8sServiceHost. I thought that this would be used for the initial cilium setup, but apparently this then became part of the active configuration and when that first node went down, everything went down with it – the API server’s IP was no longer available!
After looking around a bit, I saw that an option would be to either use 127.0.0.1 as the host address, or leave it blank and let cilium take care of the API server’s address. The first option would break the Load Balancer functionality, since local addresses don’t have a MAC address, so, no ARP for you. The second would seem to work, but it was unreliable. Initially everything was fine, but after I shut down one of the nodes and started it again, some cilium pods and ingresses could not be created. Even a complete uninstallation and reinstallation of cilium wouldn’t play nice.
I eventually found a couple of GitHub pull requests where people encountered the same issue and provided an alternative. The developers recognised the problem and the proposed solution is to accept a list of addresses for that variable. Unfortunately it hasn’t been released yet and I would rather not go with a non-production version. I am kind of surprised that not too many people seemed to have encountered that issue (as well as how bad Google’s search results have become the last few years).
So what would be an alternative option? Keepalived! I installed keepalived in all three nodes, then reinstalled cillium with that Virtual IP as the API Server’s address. Well… no dice, now the self-signed certificate was not trusted.
The solution was to go to the k3s configuration file (create a new one named /etc/rancher/k3s/config.yaml since by default it won’t exist, but don’t touch the k3s.yaml file) and add the following lines
tls-san:
  - "IP of node 1"
  - "IP of node 2"
  ...
  - "Virtual IP"
Then stop the k3s service from all nodes, and rotate the certificates (k3s certificate rotate). Restart your nodes and everything should work properly.
There was another, third incident, but I am not sure what happened and why, and whether it was a side-effect of my previous experiments or a bug. At some point, I could not curl one of the websites running on the cluster, through its ingress. I use a dedicated load balancer per ingress (I have IPs to spare) and I assign their host names to my DNS server. The thing is, I could access it from any other machine, except from within the cluster on nodes the (singular) pod was not running from.
I tried with NGINX Ingress controller and it worked. I assumed this was a bug with cilium or some kind of limitation that I didn’t manage to investigate properly with google searching. I thought about uninstalling Nginx I.C. and putting back cilium and… it worked. It has worked ever since and to this day, I am still unsure as to what happened and why.
Longhorn
Longhorn worked mostly unproblematically, with one exception. On one of my shutdown tests, the MariaDB cluster went down hard and I then had to rebuild it. What happened was that the volumes were not distributed in an 1 to 1 relationship with the nodes, so when that node went down, it took down the volumes of two instances of the MariaDB cluster with it. Oops!
The solution that may have helped was to enable Best-Effort for the Data Locality option, and although in theory that shouldn’t be needed, it kind of makes sense in the context of a StatefulSet. I also enabled Replica Balance to best effort, in an attempt to ensure that the distribution is even. But I don’t trust it yet, so even for the MariaDB cluster I have it set the amount of Replicas to 2, until I am comfortable enough to get it back to 1.
… Speaking of MariaDB, during my testing, sometimes the cluster wouldn’t be able to recover itself and I had to manually intervene. In mild cases, I just had to force bootstrapping by modifying a file (grastate.dat) in the first instance of the StatefulSet. In the worst of them, the cluster wouldn’t behave and would refuse to run and I had to restore the InnoDB files from backup. I am not sure if this is caused by Longhorn not shutting down properly or MariaDB not handling shutdowns properly, but it is quite intermittent and only happens during unclean shutdowns.
Speaking of shutdowns, the ideal way is to go to Longhorn first, disable scheduling and request eviction of volumes, and when that’s done, you can then drain the node and restart it.
Also note that when you specify a size in your PersistentVolumeClaim, this amount of space is reserved from your volumes multiplied by the number of replicas you allocate. So for a 10GBi volume with three replicas, you will reserve 30GBi of storage in total.
Vault
I have removed Vault from my configuration, due to a complication and the resulting balance between effort and benefit.
Vault has given me the most problems compared to all of the above. I wasn’t sure how to begin, and looking for a guide only I found out that most of the ones I found (even official ones) was either incomplete, or on a Proof-of-Concept level.
Ironically, Vault’s documentation seems to have a couple of different Kubernetes deployment guides, but I found that this one was not only complete but also on an ELI5 level which can get you started very quickly. It has a lot of manual steps, but you can automate them when you get a better grasp of its (dense) configuration. And despite issuing certificates from my local CA (also in the root trust store), I eventually had to disable TLS negotiation between the nodes to make it work. TLS is hard, especially on a private network.
That was all well and good, but how do you actually use the secrets (at least in the context of Kubernetes)? There are three different ways to retrieve secrets from Vault, with the more modern one being the Vault Secrets Operator. Again, hard to find a guide on how to do it right, but this one helped a lot in understanding both the concepts as well as the flow.
This shows you how to create a Kubernetes-based authentication (Vault supports many others, so it can be used with other systems as well). The simplest way to retrieve a secret for me in an pod, was the following (and keep in mind, this is a very basic example, Vault can do much more):
- Create a secret in vault. Take note of its path, e.g. secrets/mariadb.
- Create a service account. It does not need any special roles assigned to it.
- Go back to Vault and create a policy. For example (notice the data part):
path “secrets/data/mariadb” {
capabilities = [ “read” ]
} - Now go to the Kubernetes authentication method in Vault and create a role.
- You can define the service account you created, the namespace to limit that to, and the policy you just created.
- Create a VaultAuth resource using that account.
- Define the service account name and the role under the spec.
- Create a VaultStaticSecret, adding the VaultAuth’s name to vaultAuthRef under the spec.
- You have the option to propagate this to a standard Kubernetes secret with periodic refreshing.
But wait, there’s more! Vault is encrypted. That’s the whole point, sure, but it’s encrypted with a key that’s not stored in the cluster. Vault calls this “sealing”. So how do you unseal it? You have 3 options:
- Manually, by going into the pod using kubectl exec and running vault operator unseal (then providing your unseal key).
- You can in theory have an automated job that checks if the vault is sealed and then unseal it, but then… you are storing the unseal key in an insecure location.
- You need to do this on EVERY node in the Vault cluster. If the host node or the pod restarts, that instance will be sealed. Vault will utilise the other instances, but I am not sure if you can actually write on it while not all instances are available or whether it will sync later.
- Use a Cloud Provider’s KMS.
- Use a HMS (hardware security module).
Needless to say, if all vault instances are down for the count by virtue of being sealed, your applications relying on it won’t work. With the above example, the secrets should stay in place so in theory you should be safe, but if you use other options, such as Dynamic Secrets, that will probably be a no-go. On the other hand, unless your cluster is unstable, you shouldn’t experience that too often.
Removal of Vault
I had to remove Vault. It worked well, until I made a series of mistakes and the effort of rebuilding it was deemed to not be worth it. Specifically, I initially allocated too much space for both secret and audit storage. In an effort to reduce the space I attempted to take a backup from within vault (using its CLI). I discovered then that the Vault was unhealthy for some reason and I couldn’t restore it back to working condition. Apparently, at some point two of the nodes went down, and the third kept looking for its master node, and failing that (to avoid a split-brain scenario I guess) it remained in inactive mode, without any ability to force it to become active.
I am still not sure what happened to the other two nodes, but their copy of the configuration was gone and the vault appeared to be uninitialised in those nodes. Whelp! Luckily, I hadn’t stored too many secrets there and I had also stored them in KeePassXC as a backup.
This is a serious disadvantage in homelab recovery scenarios. When I encountered a similar situation with the Galera (MariaDB) cluster, I could at least force it to bootstrap again with whatever data loss risk there was (there was none), but if that were to happen again, I would be stranded.
There is also another consideration with the Vault Secret Operator regarding security. While it’s very convenient by creating local Secret resources, those remain unencyrpted. The alternatives are to use the Vault Agent in a side-car (which relies on rather ugly annotations) or the CSI driver where you mount the secret as a volume.
These, combined with the need to manually unseal the Vault if a node goes down made me reconsider. I decided to rely on standard Kubernetes secrets, accepting whatever risk there is.
Helm and the general effort
This is a big gripe. When I deployed everything through docker compose (and Portainer), getting a working and stable configuration was relatively easy. Not so with Kubernetes. Manifest files can become large, label matching doesn’t follow a linear flow (but it’s very flexible) and deploying something, anything, takes a lot of experimentation and careful design.
Helm makes this easier and more complicated at the same time. It’s a package manager for manifests, but if there’s something that is not predicted by the Helm chart, you will have to create an additional manifest and apply it after the chart (not sure if there’s a better way). Thankfully, many charts are quite flexible and offer a lot of customisability, but ironically, this is what makes getting an initial deployment harder than it has any right to be.
Closing words
I must admit, you get a sense of achievement when you see that your service is happily running despite your server going down. I spent twothree weeks of my afternoons until late night, learning, configuring, starting from scratch and fine-tuning everything and there is still so much to be done to get this done right.
Despite that, I am of the opinion that most people do not need Kubernetes at home, unless you need to learn to work with it for your day job (or if you have masochistic tendencies when it comes to IT, like I do). Most people don’t care about self-hosting even if Cloudflare is a nice and secure way to get that going and certainly the vast majority does not care for High Availability.
I also haven’t migrated most of my services yet I did migrate all my services and the next ones were obviously easier to get them right, though each one had its own special set of snags. Converting from docker to kubernetes is much more than running kompose and it takes way more time than expected; feels almost like toiling. Additionally, certain services are not easy to migrate or do not make sense to do so, because of hard dependencies. For example, making your NAS highly available is pointless, since if your backing storage goes down, the front-end service has nothing to work with.
Same goes for e-mail. Cloudflare’s DNS proxying works for HTTP connections, but e-mail uses SMTP/POP and that cannot be proxied. Even if it were possible, getting an e-mail server “right” without losing trust from other servers in the world is hard, making it a pointless endeavour.
Despite all of the above, what you are building is infrastructure. After you get your feet wet and a feel of how things should be done, the next service you need to run becomes easier to implement and make it HA.
… Until it’s time to upgrade the cluster 🙂
Feel free to send me any questions or suggestions at blog[at]vtable[dot]org. I had to disable comments here, since the amount of spam was unmanageable.